How to Enable CloudFlare CDN on Your ProperHost Account

In this tutorial I will show you how easy it is to set up your own CDN service using the CloudFlare service that is provided for free with all ProperHost hosting packages. CloudFlare offers a number of benefits to website owners, but one of the best features is a fully distributed, global CDN (content delivery network) service.

Why use a CDN?

CloudFlare's global CDN uses a technology called Anycast to distribute your static content across 23 data centers spread across the globe to ensure it is always close to your visitors. The result is that your website, on average, loads twice as fast for your visitors regardless of where they are located. In addition you will potentially save large amounts of bandwidth as your static files (images, CSS & Javascript files, etc.) are now downloaded through CloudFlare's network, and do not count towards your server bandwidth. This means huge savings for a high-traffic website.

Create a CloudFlare CDN on your account

As ProperHost is a CloudFlare hosting partner, the CloudFlare service is fully integrated in our cPanel hosting control panel. It can be enabled with the click of a button. Once CloudFlare is enabled you will be able to view various stats directly from cPanel, such as how much bandwidth has been saved and more.

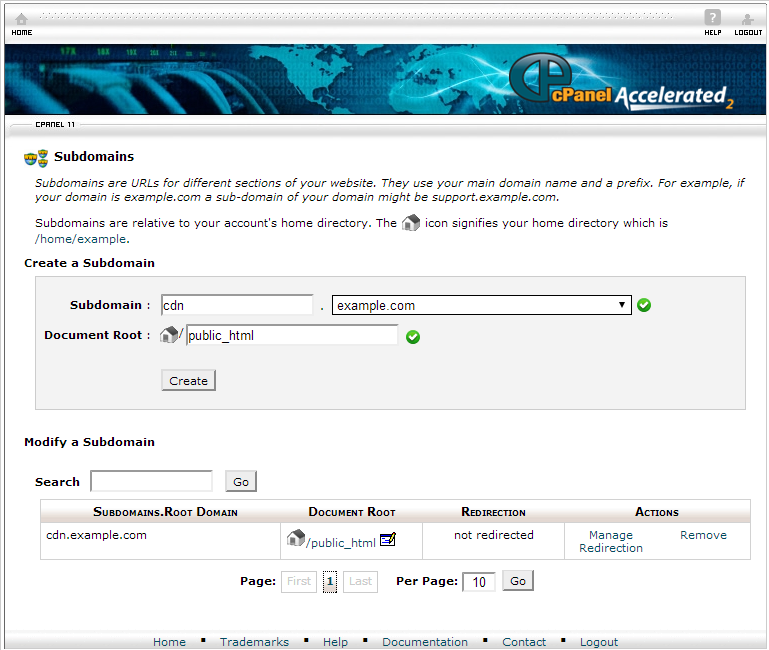
CloudFlare is turned on/off per subdomain, so we recommend creating a new subdomain for the CDN. Let's call it cdn.example.com. In this example we have pointed the subdomain to the location of your main domain for simplicity, but you may put your static content in a separate directory if you want.

Create subdomain in cPanel

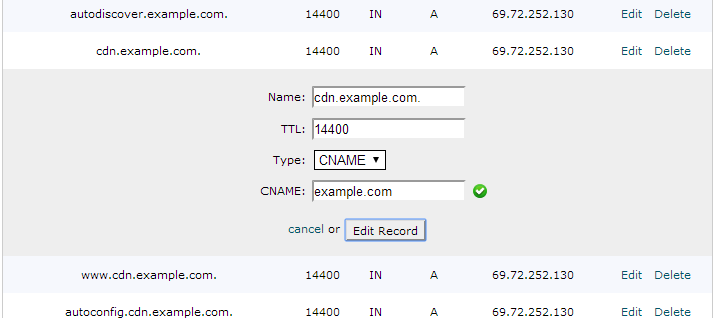
There is one little change we need to make in order to enable CloudFlare CDN for the subdomain. Open the Advanced DNS Zone Editor from the cPanel main menu, and then change the type of the newly created cdn.example.com entry from an A record to a CNAME record as shown below.

cPanel CNAME record

Click on Edit next to the cdn.example.com entry, and then change Type to "CNAME" and enter your domain name for the record (example.com). Click Edit Record to save the changes.

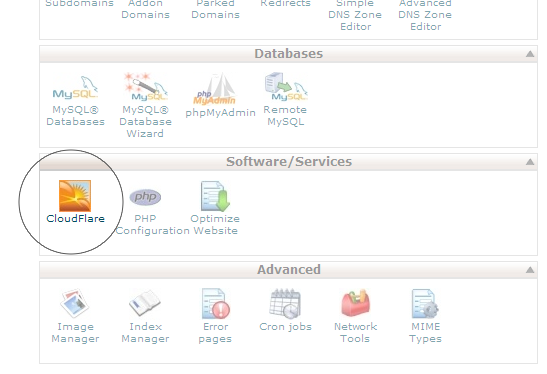
We are now ready to enable CloudFlare for the new subdomain. On the cPanel main menu, click on the CloudFlare icon.

cPanel CloudFlare icon
Enable CloudFlare in cPanel

Next you must type in your email address to sign up for your free CloudFlare account. Everything is integrated so you don't have to leave the cPanel during this process.

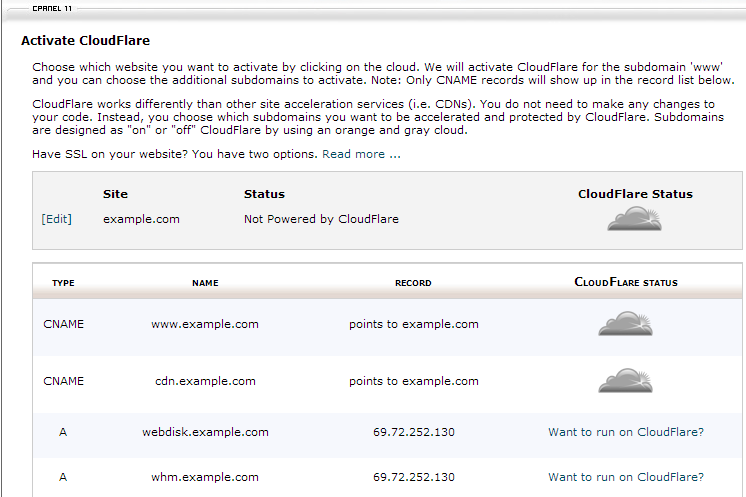
Once your account has been created, you will see a page like below.

Enable CloudFlare in cPanel

Now simply click on the gray cloud icon CloudFlare off next to the cdn.example.com entry to enable CloudFlare for that subdomain. Once it has been activated, the icon will turn orange CloudFlare on.

The CloudFlare CDN and optimization service is now activated for your domain and will start resolving within a few hours.

Use the CDN in your application

Now that the CDN is created and ready to use, it is time to configure your web application to make use of it. Exactly how to do this varies between the different web applications and frameworks, but if you are using a CMS or similar script, there should be an option to specify the URL for static content. If you are developing your own website, you can simply point all image files, CSS, Javascript and other static files to the CDN url.

How to use CDN in a Magento store

If you are using Magento, you can easily enable the CDN following these steps:

  1. Log in to your Magento Admin Panel;
  2. Click on System -> Configuration -> Web;
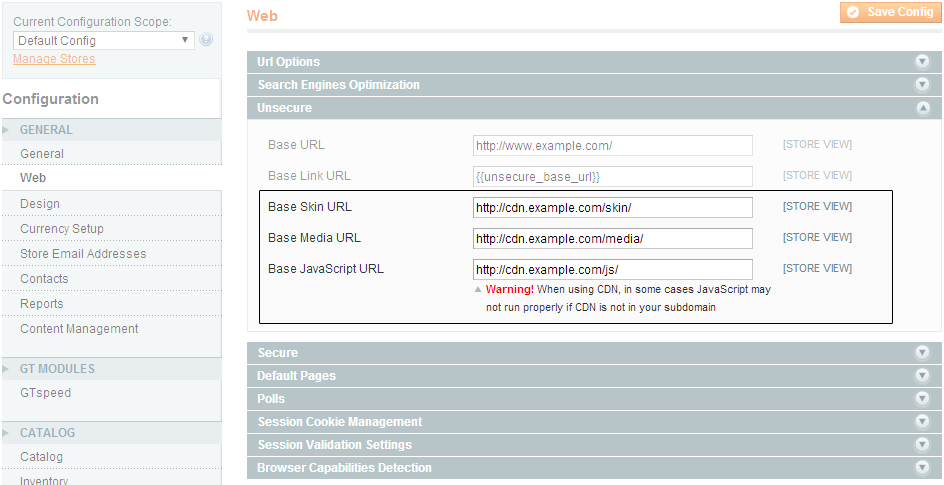
  3. Enter your CDN URL for the Base Skin URL, Base Media URL and Base JavaScript URL;
  4. Clear the cache for the changes to take effect.
Enable CloudFlare CDN in Magento

Magento CE 1.8.1 Released

Magento Community Edition 1.8.1 has just been released. The new release aims to improvement overall product quality and ease operations by providing significant tax calculation improvements, a wide range of bug fixes, and several security enhancements.

As the new version includes several security fixes it is advisable that everyone upgrade to the latest version in order to stay protected against possible security vulnerabilities.

Read the official release notes for more information.

Magento CE 1.8.1.0 is available for download here: http://www.magentocommerce.com/download

As always, if you need help upgrading your Magento store, feel free to purchase our professional Magento upgrade service.

ProperHost Ranked Top-3 Fastest Magento Host

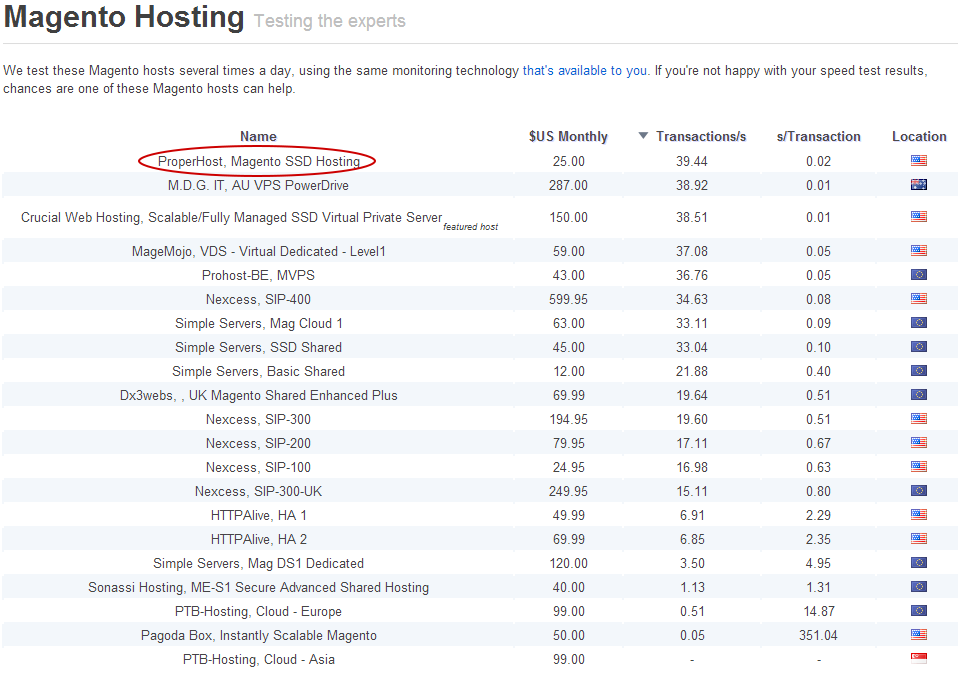
In a recent benchmark test conducted by magespeedtest.com, ProperHost was ranked among the Top-3 fastest hosting providers for Magento, including providers from both the US, EU, Australia and Asia!

ProperHost Magento Speed Test

Needless to say, we are very pleased with the results, which confirms our hard work and dedication to bring you the fastest and most reliable Magento hosting in the industry!

MageSpeedTest is an independent, unbiased website running automated speed tests against the most popular hosting providers for Magento. Under the hood, the test uses Siege, an http load testing and benchmarking utility that simulates actual users browsing the website. The results show how many transactions per second the web server is able to process, which is a good measure on how fast the page loads and how many concurrent users the server will handle.

Replace Magento’s File Cache Backend with an Ultrafast Memory Cache

One of the best hidden features of Magento is its ability to utilize different cache backends. By default, Magento stores its cache on the local file system which is not really optimized for high performance. Especially with slower SATA disks and even Solid-State Disks, this generates significant IO overhead. Our aim is to minimize latency so pages can load as quickly as possible. We will achieve this by moving the cache to RAM (random access memory), which provides virtually zero latency.

Cache backends

Magento uses a plugin architecture which allows us to easily replace the cache backend implementation. Premade implementations exist for the following cache backends:

  • File System (default)
  • Database
  • Memcached
  • Alternative PHP Cache (APC)
  • XCache
  • eAccelerator
  • Redis

We will now look at how to replace the file system cache with Memcached, a high-performance, distributed memory object caching system. Memcached is available in our Magento Professional and Enterprise hosting packages.

Two-level backend

While RAM is extremely fast, it provides much less storage capacity than durable storage technologies such as the file system or a database. Therefore, Magento supports a two-level backend, which makes it possible to combine two different cache backends – a fast but small one and a slower but bigger one. We recommend using Memcached as the fast backend and database or file system as the slow backend. Note: we are using very fast Solid-State Drives on all our servers which offers unprecedented performance compared to even the fastest SAS drives, so read/writes to the file system will actually be very fast compared to normal standards.

Configuration

Configuring the cache backends is as simple as editing the Magento configuration file (app/etc/local.xml).
<global>
... <cache>
<backend>memcached</backend> <slow_backend>database</slow_backend> <fast_backend>Memcached</fast_backend> <fast_backend_options> <servers> <server> <host>unix:///home/<username>/.memcached/memcached.sock</host> <port>0</port> <persistent>0</persistent> </server> </servers> </fast_backend_options> <memcached> <servers> <server> <host>unix:///home/<username>/.memcached/memcached.sock</host> <port>0</port> <persistent>0</persistent> </server>
</servers>
</memcached>
</cache>
... </global>

We run Memcached over Unix socket on our servers so you will need to add the correct path to the Memcached socket in the code above. Normally the path will be unix:///home/<username>/.memcached/memcached.sock, where <username> is your cPanel username. If Memcached is supported by your hosting plan just open a support ticket and we will enable it for your account.

That's all it is to it. Your Magento store is now configured to use Memcached as the fast backend. It will take a little while until the cache builds up before you notice the performance improvements, but then it should be much faster and able to handle more concurrent users.

If you have any questions feel free to contact our support department.

Speed Up Magento with a Full Page Cache

In this article we will look at how we leverage the Full Page Cache extension from Extendware to speed up Magento and improve page loading times. A full page cache aims to reduce site latency, increase the web server transaction rate, and reduce database load, resulting in a faster and much more responsive web site. Knowing that a web page’s load time has a direct influence on search engine ranking and shopping conversion rates, it becomes increasingly important to have a snappy web site.

Consider the following facts:

  1. Google considers site speed when ranking Web sites and determining how many pages to crawl1
  2. A study by Forrester Consulting determined that 47% of online consumers expect a web page to load in 2 seconds or less, and 52% said that site speed is important to their site loyalty2
  3. Gomez found that up to 40% of customers will abandon a shopping site if it takes more than 3 seconds to load and every second delay results in a 7% reduction in revenue3

This shows how important it is to stay within that 2-3 second threshold, or else you might be losing out to the competition.

We will now look at how ProperHost Magento optimized hosting combined with the Extendware Full Page Cache can help you achieve this goal. Through our partnership with Extendware, all ProperHost customers get one year free use of the Full Page Cache extension. Some of the features of the Full Page Cache extension include:

  • Multi-level cache cupport
    The Full Page Cache combines two cache systems into one. The first level cache is an extremely fast full page cache that increases server throughput by more than 50+ times. Requests that hit the first level cache will not even use the database. The second level cache is an advanced full page cache with hole-punch support. The second level cache will even work for logged in users, users with items in their cart, etc and further improves server throughput with a corresponding decrease in latency.
  • Multiple store support
    Multi-store / domain setups in a single Magento installation are fully supported. There is no need to worry about cross-site cache tainting or other issues commonly associated with other cache products.
  • Increase requests per second and alleviate database load
    The primary cache will increase requests per second (and decrease latency accordingly) by 26.5 times. The secondary cache will increase requests per second by 2.5 times. All requests hitting the primary cache will not use the database, so your database load will decrease significantly. The end result is a much faster, more responsive site.
  • Hole punch support
    The second level cache supports hole punches. This means that pages can be cached even when there is dynamic content, the user is logged in, etc. All the hole punches (11 in total) that are needed by a default Magento installation are included. Creating new hole punches is super easy. No need to edit config files or anything.
  • First class mobile theme support
    Mobile themes, theme overrides, and more are easily supported using segmentable useragents. Simply input the useragent patterns you want to match on (example: iphone|blackberry|android) and your cache will be segmented accordingly.
  • Auto-tagging and auto-flushing when content is updated
    A cache is only effective as long as there are cached items. Normally a full page cache must be flushed after changes have been made to products, categories, and cms pages. This is inefficient because changing one product can invalidate the entire cache. The full page cache supports auto-tagging and auto-flushing, so that whole cache flushes rarely ever need to be done. After you edit a product all pages associated with that product will be flushed and the others will be unaffected.
  • Simple configuration
    The Full Page Cache is installed as a Magento extension, and everything can be configured via a graphical user interface. Disqualify pages, add block disqualifies, include pages in the cache, and more is all done during the configuration screen (check out the demo). Most installations will never have to do anything more than enabling the cache. Everything else (hole punching, disqualifying, etc) will be done automatically!

Minimum Requirements

The Full Page Extension is compatible with Magento CE 1.4.1.0 or later, and Magento Enterprise 1.9.1.0 or later. There are no other prerequisites. Log into your account at www.extendware.com and download the extension (ProperHost customers get it for free – just use the same email address that you have registered with us).

Installation

Installing the page cache extension is very simple if you follow these instructions.

Prerequisites:

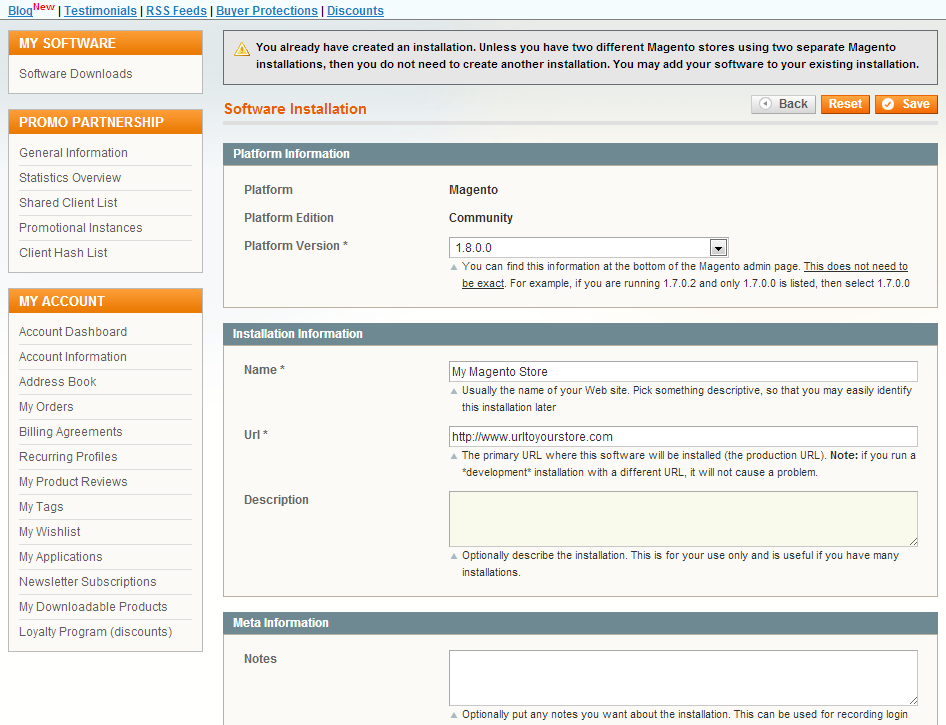
Before you can download the software, you need to register an account and add your Magento Store in the Extendware Control Panel. This is necessary so that your license can be validated against your website URL. Log in and click on the Software Downloads link in the left menu under My Software. Then click Add Magento Store. Fill out the information pertaining to your store, such as Magento edition/version, URL and a name to help you identify the installation. Your store has now been associated with your Extendware account and you can proceed to download the software.

Add Store in Extendware

You should also prepare your Magento store for the installation by taking these steps:

  • Disable system compilation in System -> Tools -> Compilation.
  • Disable caching in System -> Cache Management. Select all cache types and disable them.
  • Upload a file maintenance.flag to the Magento base directory. This will ensure the database is updated correctly and your users do not receive errors during the upload process.

The Full Page Cache has a dependency on the Extendware Core package, so we will install that first.

  1. Click on the Manage Software option in the dropdown next to your store, and then click on the Extendware Core package, followed by the Download button.
  2. Extract the downloaded zip archive to a folder on your computer.
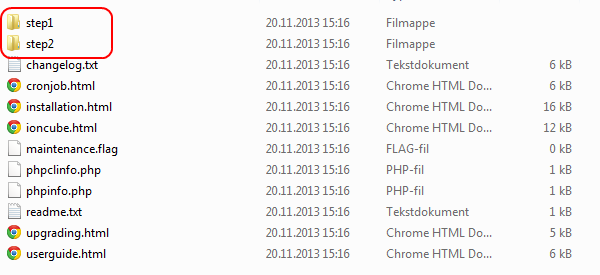
  3. The archive contains two folders; step1 and step2. Upload the content of both files to your Magento base directory using your favorite FTP client or the cPanel File Manager. Say "Yes" to overwrite if some of the files already exist.
    Extendware Installation Package
  4. Delete the maintenance.flag file so that your store is accessible again.
  5. Logout of the Magento Admin Panel and log back in. If you fail to do this, then you cannot configure the extension.
  6. You may re-enable the Magento cache. However, please refresh the cache prior to enabling it by selecting all cache types and hitting refresh.
  7. You may now re-enable system compilation if you want (ensure to re-run it before enabling it).

You have now successfully installed the Extendware Core package, and you should see the new Extendware option in the top menu.

Enable Extendware Full Page Extension

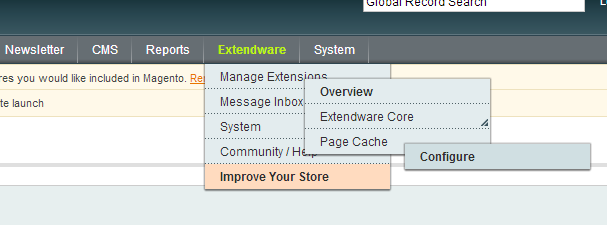
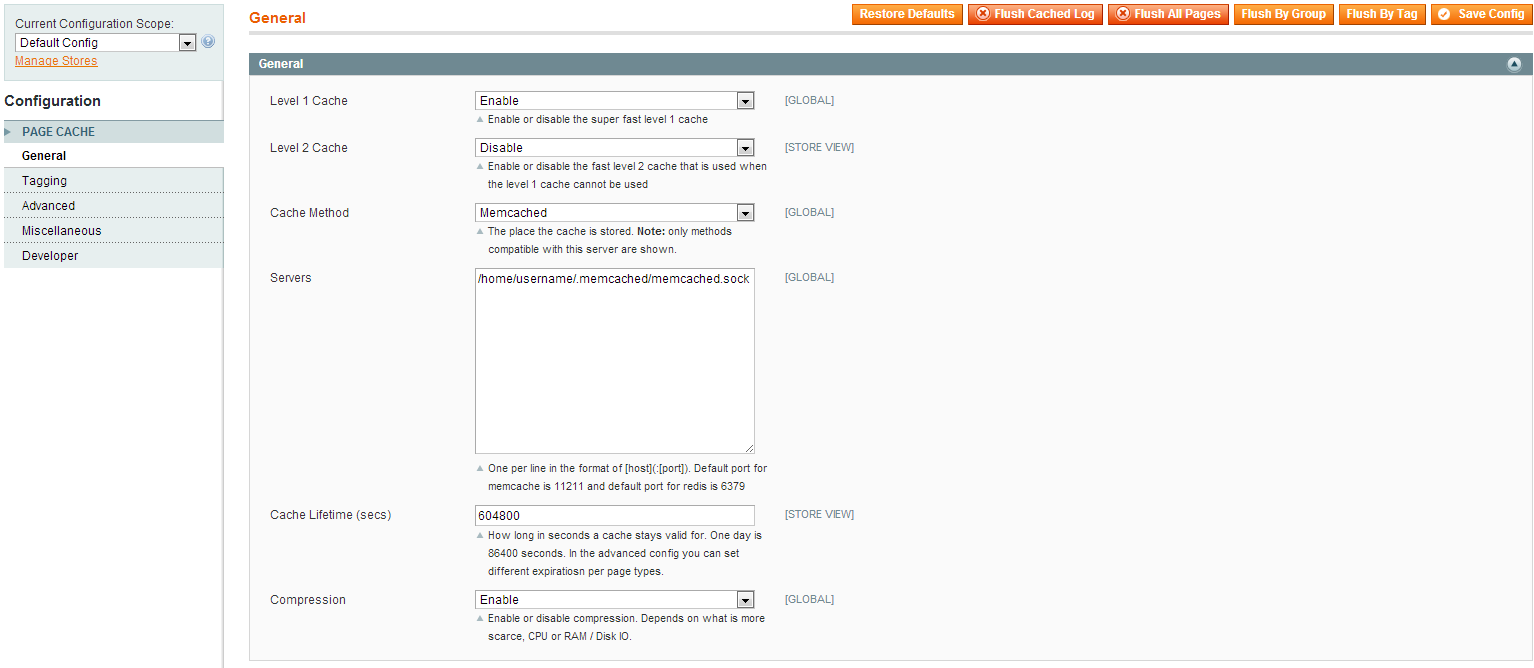
We will now install the Full Page Cache extension following the same steps (1-7). Once the installation is complete, log in to your Magento Admin Panel and navigate to Extendware -> Manage Extensions -> Page Cache -> Configure and set the configuration according to the following:

Configure Extendware Full Page Cache for Magento

Ensure the Level 1 Cache is enabled. If you have Memcached enabled for your hosting account, we recommend choosing Memcached as Cache Method. Otherwise, choose File. We use ultrafast Solid-State Drives on our servers, so the File cache is very fast. Compression should be Enabled for Memcached, and left Disabled for File cache method.

Note: Do NOT choose XCache if using our shared Magento hosting as the XCache cache method does not work in a shared environment.

Finally, save the configuration and enjoy the speed improvements of the Full Page Cache!

Magento cron job

The Extendware Full Page Cache makes use of a cron job to regularly flush stale cache entries. For this to work, the default Magento cron job must be correctly configured. For a tutorial on how to set this up in your cPanel account, please refer to https://www.properhost.com/members/knowledgebase/32/How-to-set-up-the-Magento-cron-job-or-scheduled-tasks.html.

Support and troubleshooting

If you need support or help with the installation and/or configuration of the extension, please contact Extendware directly for the best assistance. You should also read the User Guide that is provided for free with the extension.