How to Upgrade Magento 2 CE using System Upgrade
In this tutorial we will go through the steps necessary to upgrade a Magento Community Edition (CE) 2.x installation using the web-based updater application. At the time of writing, the latest stable version is Magento CE 2.1, but the same steps should apply to future versions as well.
Prerequisites
Starting with the 2.1 release, Magento is no longer supporting PHP 5.5, making PHP 5.6 the new minimum requirement. This is a welcome change as PHP 5.5 will reach End-of-Life (EOL) in July 2016, but it may cause problems for some users as not every hosting provider has made the leap to PHP 5.6 yet.
Magento 2.1 supports both PHP 5.6 and PHP 7, and ProperHost users can freely choose between the two versions. In this tutorial we will use PHP 7, which offers the best performance and latest features. We also assume that Magento is installed in the top-level directory (root) of your account, i.e. /home/<username>/public_html where <username> is your cPanel account username. If you have installed Magento in a sub-directory or add-on domain folder, you need to adjust the paths in the commands accordingly.
Step 0: Backup, backup, backup!
Before you do anything, make sure to create a full backup of your files and database. You can use the cPanel Backup Wizard or create the backup using SSH. We do not recommend that you use the built-in backup functionality in Magento as it can be unreliable.
Step 1: Set PHP 7 as the default for your installation
Create an .htaccess file in your home directory (e.g. /home/youruser/.htaccess) with the following content:
AddType application/x-httpd-php7 .php
This will ensure all .php files in your account is processed by PHP 7. If you want to use PHP 5.6 instead, simply replace php7 with php56 in the line above.
Note: it is important that you save this .htaccess file in your home directory, or a parent directory to your Magento installation. If you add it to your Magento .htaccess it will be overwritten by the Magento upgrader and it will revert to the server default PHP version which may differ from the one you prefer.
Step 2: Configure the cron jobs
Many of the admin backend tasks as well as the upgrade system requires that the Magento 2 cron jobs are configured properly.
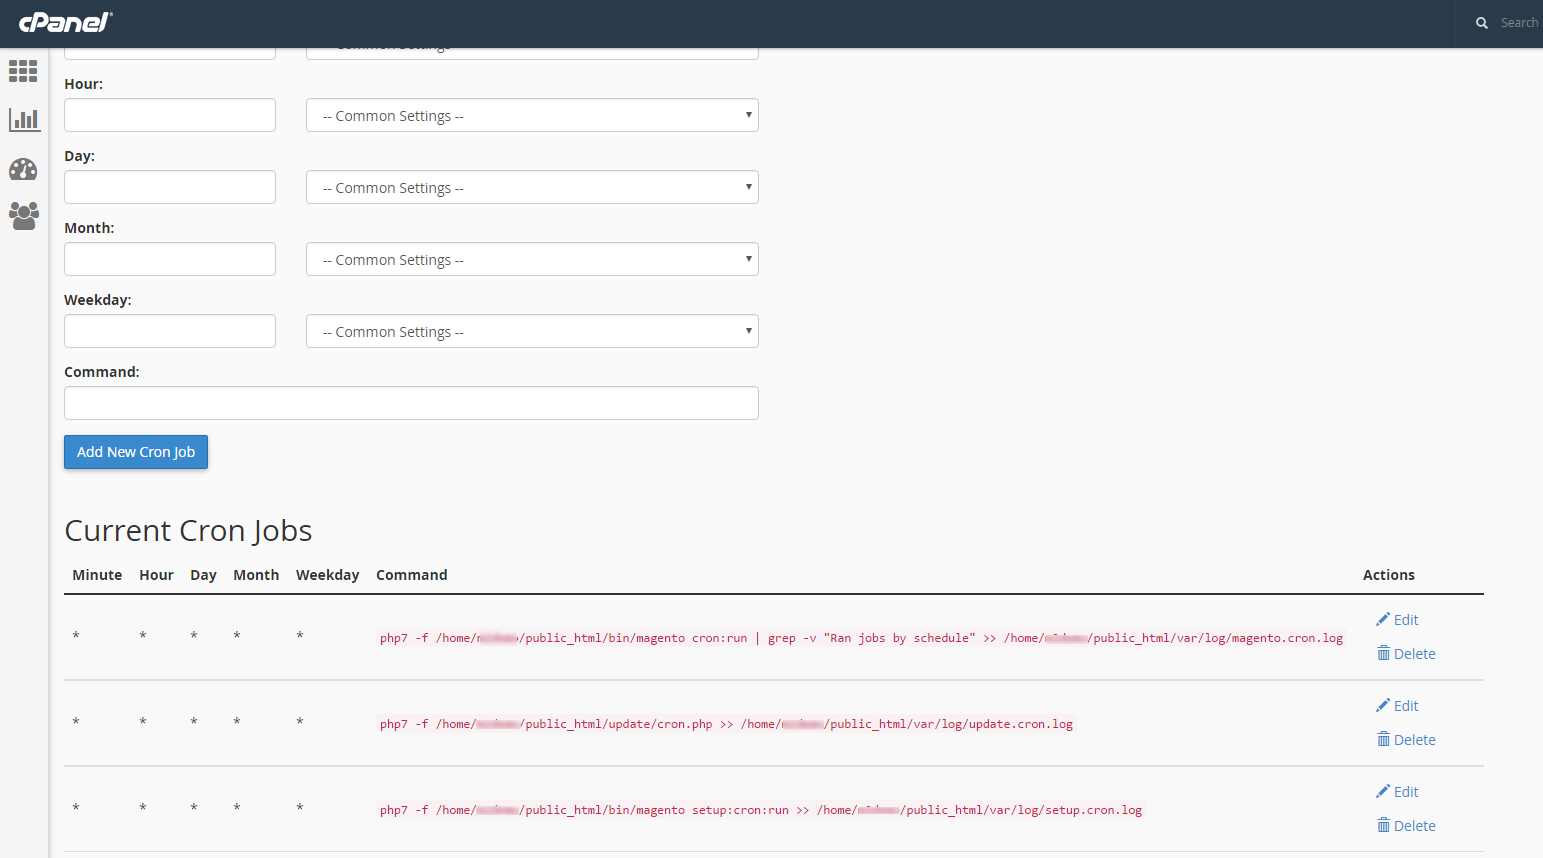
Log in to your cPanel and click on Cron Jobs in the Advanced section. Add three cron job commands and configure them to run Once Per Minute:
 php7 -f /home/<username>/public_html/bin/magento cron:run | grep -v "Ran jobs by schedule" >> /home/<username>/public_html/var/log/magento.cron.log
 php7 -f /home/<username>/public_html/update/cron.php >> /home/<username>/public_html/var/log/update.cron.log
 php7 -f /home/<username>/public_html/bin/magento setup:cron:run >> /home/<username>/public_html/var/log/setup.cron.log
Replace <username> with your cPanel account username. Again, if you prefer to use PHP 5.6 you can replace php7 with php56 in the above commands. When the cron jobs are configured correctly it should look like this:
Step 3: Edit composer.json (Sample Data only)
If you do not have the sample data installed you can skip this step.
Depending on which version of the sample data you have installed previously, you might have to manually correct the component dependencies. If the readiness check fails at “Check Component Dependencies”, open the file composer.json in your installation root directory and change the required version from "100.0.*" to "100.1.*" for each of the sample data modules (see below).
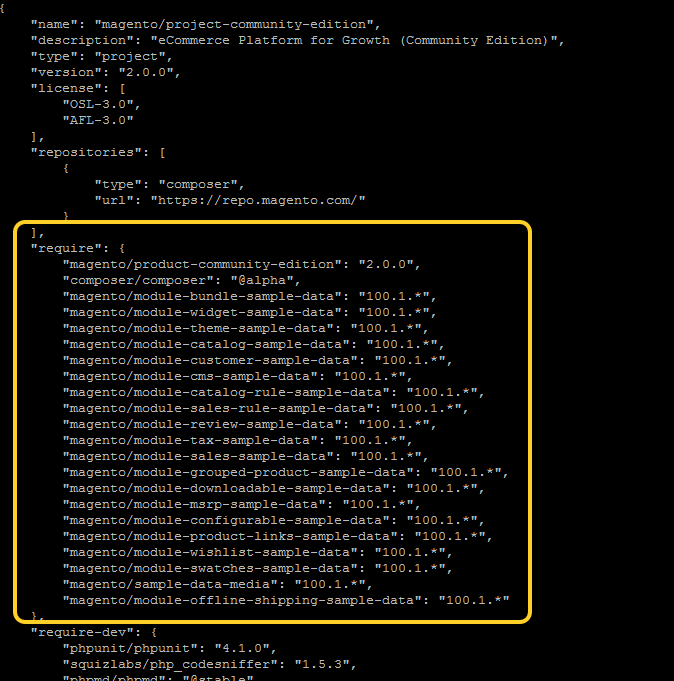
Save the file and continue to Step 4.
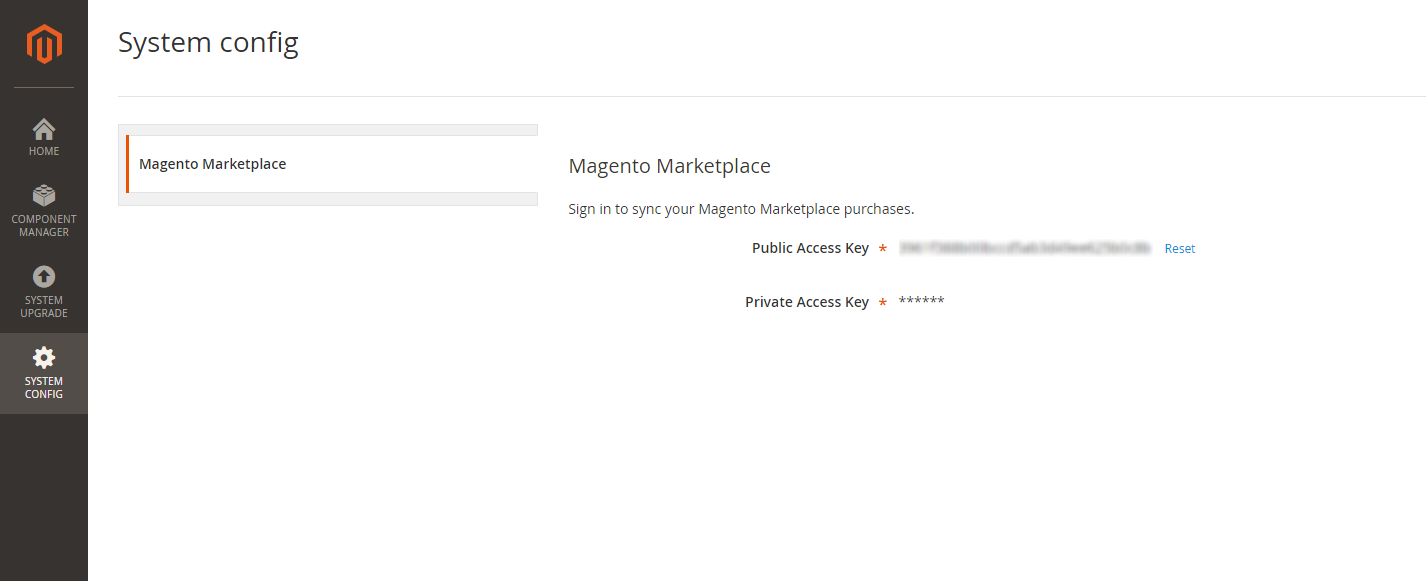
Step 4: Set up Marketplace Authentication Keys
In order to use the Magento 2 System Upgrade and Component Manager you first need to set up Magento Marketplace authentication. Create an account and log in to Magento Marketplace, then go to Marketplace > My Access Keys.
From there you can generate a new pair of authentication tokens to use to Install, update, or upgrade third-party components; and upgrade the Magento software using the Component Manager and System Upgrade utilities.
Once you have your public and private keys, log in to your Magento Admin Panel and go to System > Web Setup Wizard > System Configuration. Enter your public and private access keys and click on Save.
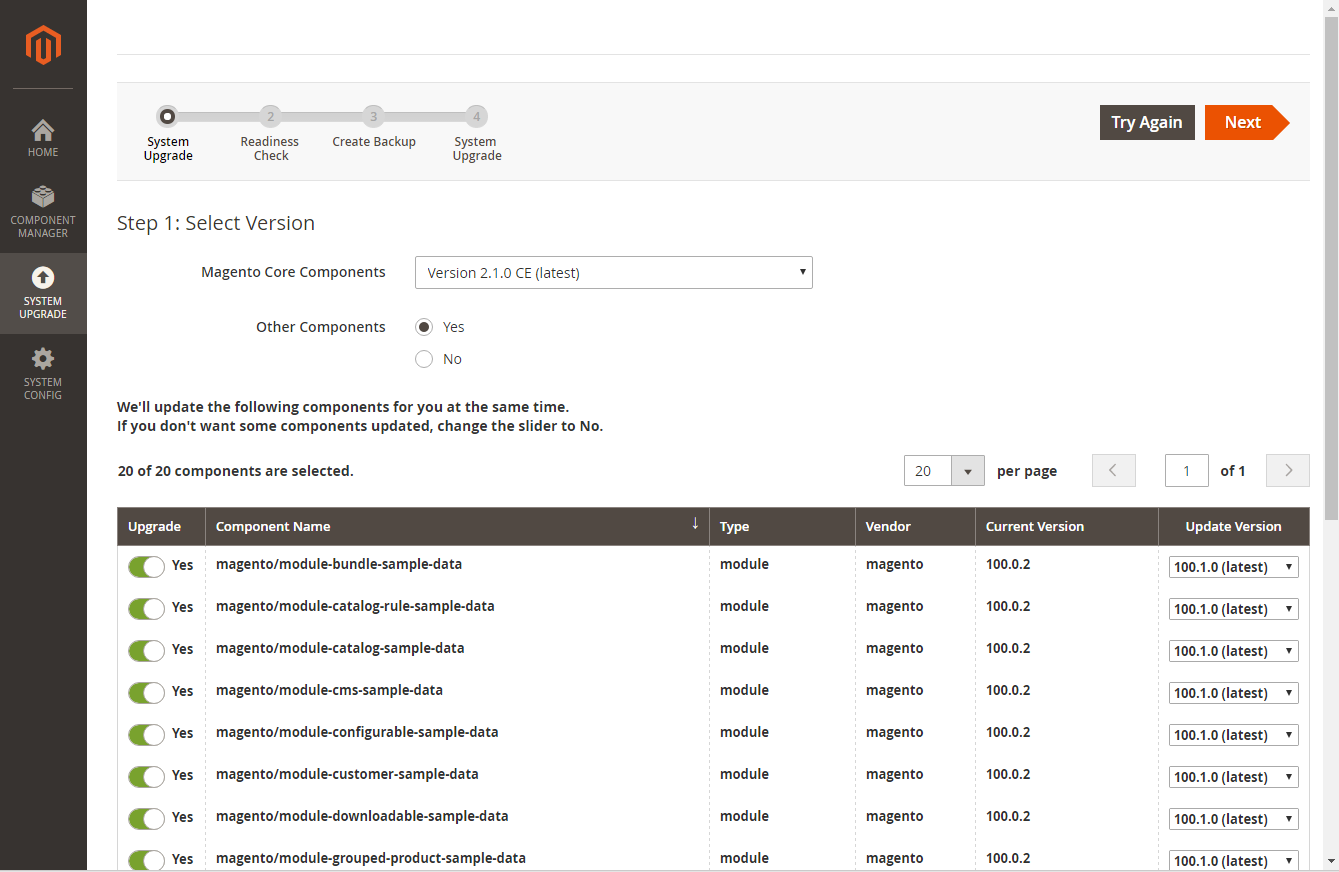
Step 5: System Upgrade Wizard
You are now ready to start the upgrade process.
Reminder: have you created a full backup of your account? If not, go back to Step 0 and create a backup first.
From your Magento Admin Panel, go to System > Web Setup Wizard > System Upgrade. Select "Version 2.1.0 CE (latest)" in the Magento Core Components dropdown, and choose "Yes" to upgrade Other Components (such as sample data). If you are upgrading the sample data, make sure that you select the latest version as well (100.1.0), then click on Next.
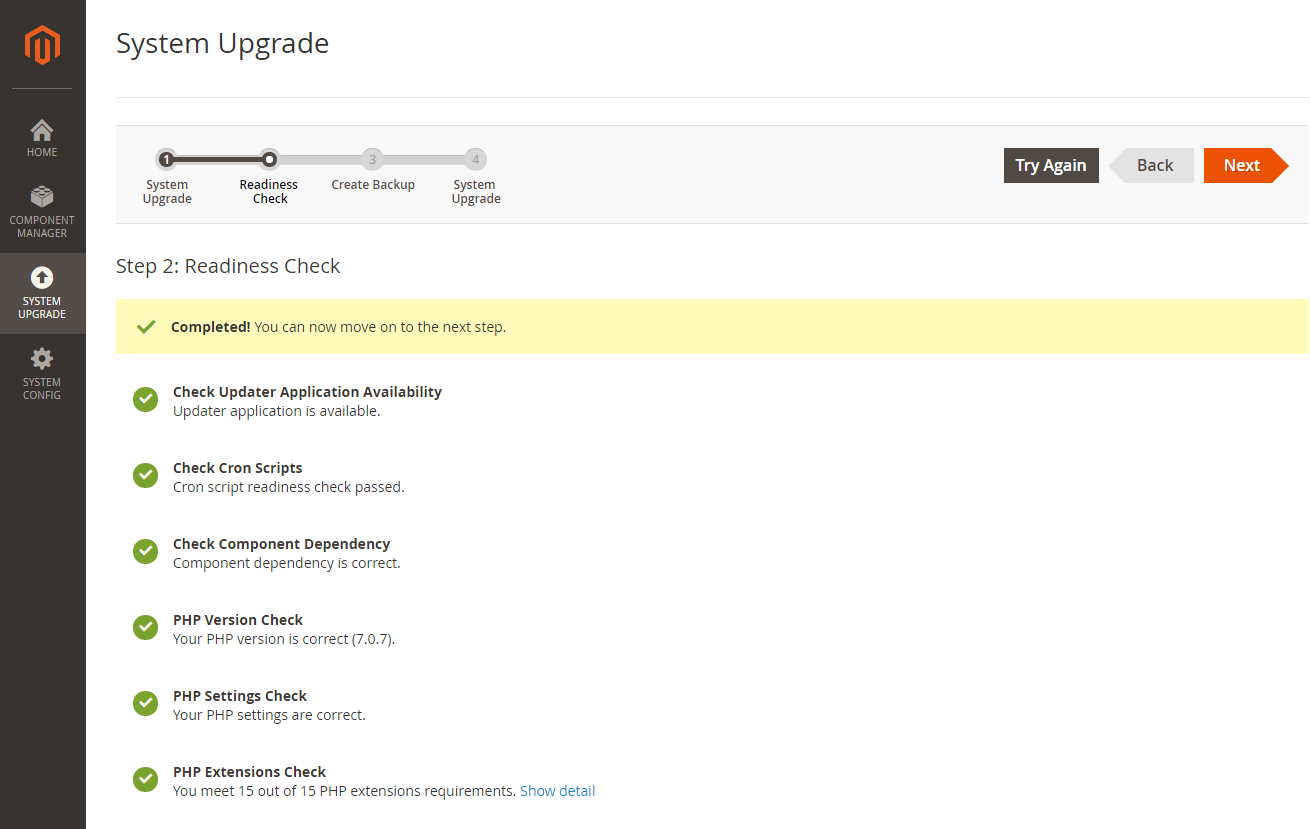
Magento will now perform a readiness check to ensure that your server fulfills all the requirements to complete the upgrade. When the check has completed, click on Next to continue.
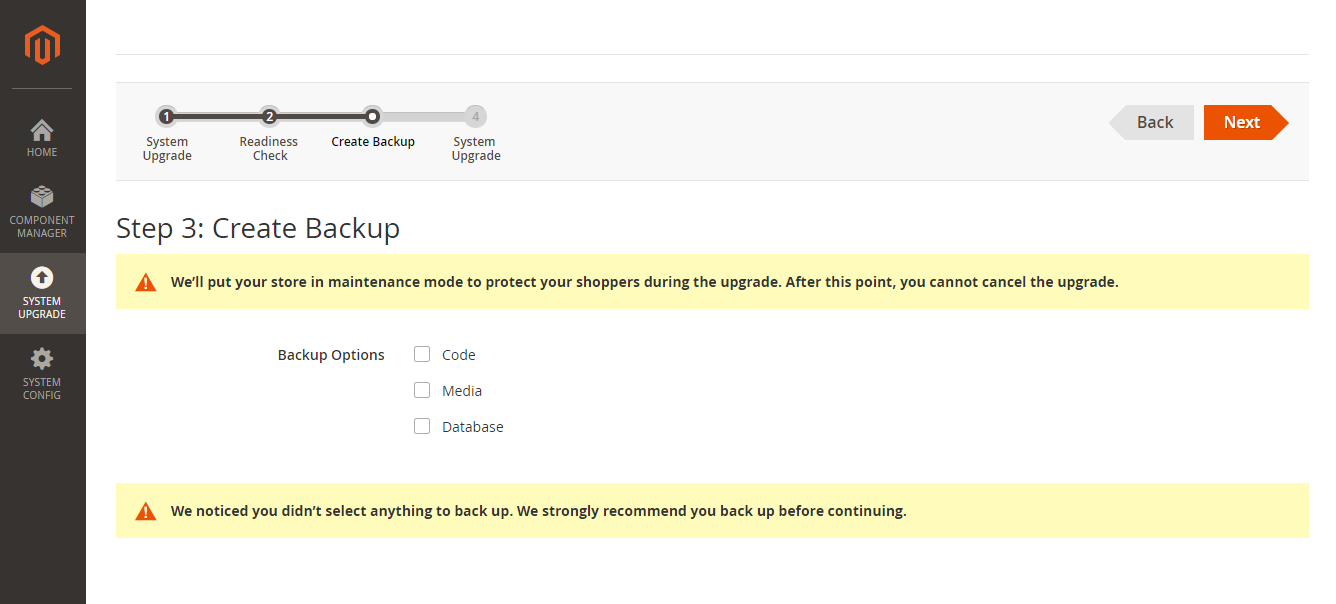
Next, you will now be given the options to have Magento backup your files and database. In our example we use an alternative method (see Step 0: Backup) to perform the backup so we remove the checkboxes and skip this step.
Finally, review your selection and click on Upgrade. Pay special attention to the version numbers to make sure you are upgrading to the correct target version.
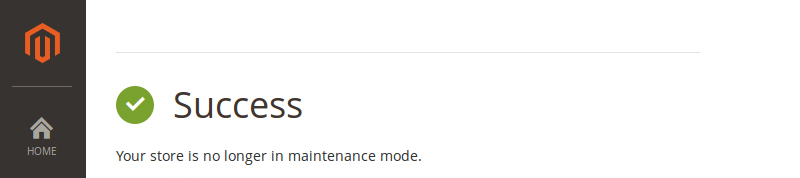
Now it is time to sit back and have a cup of coffee while you wait for the upgrade to finish. If any errors occur during the process they will be displayed in the console log.
If everything goes well, you should see a success message after a couple of minutes.
Step 6: Flush Magento Cache
The upgrader application should do this automatically for you, but it is always a good habit to flush cache after any significant changes has been made to your store. Go back to the admin panel, System -> Cache Management and click on Flush Magento Cache. Alternatively you can empty the caches via SSH:
rm -rf var/cache/* var/generation/* var/page_cache/*
That's it! Your Magento 2 store should now be running the latest version.
Bonus Step: Enable production mode and deploy static content (optional)
Before you launch your Magento 2 site you should always switch to production mode for better performance. If you are still developing your site you can skip this step.
After you have changed to production mode you also need to deploy static view files as they will no longer be generated on-the-fly. Below are the commands to change Magento mode and deploy static files using the Magento CLI utility:
 php7 bin/magento deploy:mode:set production
 php7 bin/magento setup:static-content:deploy
This will take a while so please be patient!